You harvested your garlic. Now what?
The next step is curing. Curing is a simple drying process that prepares the garlic for long-term storage. If you skip this step, your garlic will rot in a few weeks. Proper curing means you can enjoy your homegrown garlic for months.
This is important because reducing food waste is a priority for many households. Data from 2024 shows that people who grow their own food are more conscious of preservation techniques to make their harvest last. Curing is a key part of that.
What is Curing Garlic and Why Do It?
Curing is just letting your garlic dry out in a controlled way. It is not complicated.
The process does three things:
- It lets the outer skins on the bulb become dry and papery.
- It shrinks the neck of the garlic, creating a seal against moisture.
- This seal prevents bacteria and mold from getting inside and causing rot.
As the experts at Penn State Extension state, "Curing is essential for long-term storage of garlic. It allows the outer skins and neck of the bulb to dry, sealing the bulb from opportunistic fungi and bacteria."
Without curing, you will have to use your entire garlic harvest quickly.
How to Cure Your Garlic Step-by-Step
The curing process takes a few weeks, but it requires very little work from you.
1. Handle Your Garlic Gently
After you harvest your garlic, do not wash it. Water introduces moisture, which is what you are trying to remove. Just brush off any large clumps of dirt.
Leave the stalks and roots on the bulbs. These help pull moisture away from the bulb as it dries.
2. Find a Good Location
Your garlic needs a place that is warm and dry, with good air circulation. It must be out of direct sunlight. Sun can cook the bulbs and make them taste bitter.
Good places to cure garlic include:
- A covered porch or patio
- A well-ventilated garage or shed
- A warm, dry basement with a fan
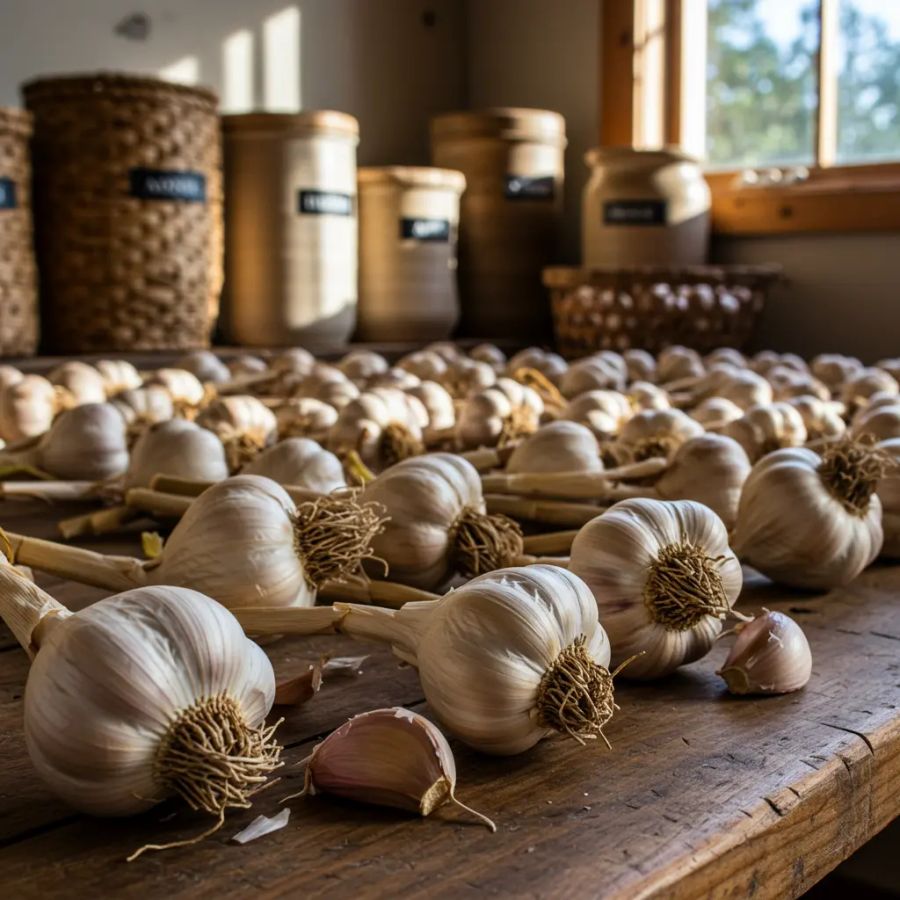
3. Hang It or Lay It Out
You have two main options for arranging your garlic to cure.
- For softneck garlic: You can braid the soft stems together or tie them in bundles of 5-10 bulbs. Hang the bundles from rafters or hooks. This is a great way to save space.
- For hardneck garlic: The stems are too stiff to braid. Lay these out in a single layer on a screen, mesh rack, or even a piece of cardboard. Make sure air can circulate all around the bulbs. Don't let them touch.
4. Wait
Curing takes about 2 to 4 weeks. The time depends on the humidity and the size of your bulbs. You just need to leave it alone and let it dry.
After Curing: How to Prepare Garlic for Storage
You know your garlic is fully cured when the outer skins are papery and the roots are completely dry and brittle. The spot where the stem meets the bulb should be hard and dry.
Once it's cured, you can prepare it for storage.
1. Clean the Bulbs
Gently rub the bulbs with your hands. The dirty outer layer of skin will flake off easily, leaving you with a clean bulb. Don't peel off too many layers. You want a few protective wrappers to remain.
2. Trim the Garlic
Use a pair of garden shears or strong scissors.
- Trim the roots close to the base of the bulb.
- Cut the stem off, leaving about one inch above the bulb. For braided softneck garlic, you can leave the braid intact.
The Best Ways to Store Garlic
Proper storage is the final step. Getting this right is as important as curing.
The Right Conditions
Garlic needs a cool, dark, and dry place. Ideal temperatures are between 55-60°F (13-15°C). The humidity should be moderate, not high. A pantry, cellar, or cool closet works well.
Do not store your garlic in the refrigerator. The cold, humid environment will tell the garlic to start sprouting.
The Right Container
Your garlic needs air circulation to stay fresh.
Store it in:
- A mesh bag
- A wire basket
- A paper bag with holes punched in it
Do not store garlic in a plastic bag or a sealed container. This traps moisture and will cause your garlic to rot or mold. It is one of the most common gardening mistakes people make after harvest.
How Long Does Cured Garlic Last?
If cured and stored correctly, your garlic will last for a long time.
- Softneck varieties store the longest, usually for 6 to 8 months.
- Hardneck varieties have a shorter storage life, typically 3 to 6 months.
Check your stored garlic every few weeks. Remove any bulbs that are getting soft or sprouting so they don't spoil the others. You can use the sprouted ones right away, just remove the green shoot.
Frequently Asked Questions
What happens if you don't cure garlic?
If you don't cure garlic, it will have too much moisture. This will cause it to rot or grow mold within a few weeks. Curing is necessary for long-term storage.
Can you eat garlic right after harvesting?
Yes, you can use fresh garlic right out of the ground. It will have a milder, less intense flavor and a higher moisture content. It just won't store for more than a week or two without curing.
How do you know when garlic is fully cured?
Garlic is cured when the outer wrappers are dry and papery, the roots are shriveled and brittle, and the neck is dry and stiff. If you cut a stem, it should be completely dry inside.
Should I wash garlic before curing?
No. Do not wash garlic before curing. Washing adds moisture, which defeats the purpose of the drying process and can lead to rot. Just brush off any large clumps of soil.
Can you store garlic in the fridge?
You should not store whole garlic bulbs in the refrigerator. The cold and moisture will encourage them to sprout. Once you break a bulb apart and peel the cloves, you can store the peeled cloves in an airtight container in the fridge for about a week.
Why is my stored garlic sprouting?
Garlic sprouts when it's exposed to cold temperatures or high humidity. This is a sign it's trying to grow. Storing it in a cool, dark, and dry pantry instead of the refrigerator helps prevent this.