
Tetranychus urticae, more commonly known as spider mites—a highly destructive pest species in cannabis cultivation.
Spider mites represent a serious threat to plant health. They feed by piercing plant cells and extracting chlorophyll-rich fluids, which compromises photosynthesis, weakens overall plant vigor, and, if left untreated, can lead to significant crop loss.
This guide is not intended to alarm you, but to equip you. Here, you'll learn how to accurately diagnose a spider mite infestation, explore proven organic and biological control methods, and implement preventative strategies to mitigate future outbreaks. Our focus is on sustainable, environmentally responsible practices that preserve both plant vitality and ecological balance.

Key Takeaways
- Early detection is everything – spider mites are easier to eliminate when caught early
- Natural treatments work best when combined with environmental control
- Prevention through proper growing conditions is your most powerful weapon
- Consistency in treatment beats any single "miracle cure"
- Both indoor and outdoor growers can successfully manage spider mites organically
The Enemy You're Fighting: Understanding Spider Mites
Let's start with the basics. Spider mites aren't actually spiders – they're tiny arachnids that are practically invisible to the naked eye. Think of them as the vampires of the plant world. They pierce your cannabis leaves with their needle-like mouthparts and literally suck the life out of your plants, cell by cell.
What makes these little guys particularly frustrating is their incredible reproduction rate. In optimal conditions (which, unfortunately, are often the same conditions we create for our cannabis plants), a single female can lay up to 20 eggs per day. Do the math, and you'll realize why a small problem can become a big problem incredibly fast.
Here's what you need to know about the enemy:
Two-Spotted Spider Mites are the most common variety you'll encounter. They're about the size of a grain of salt and can be yellow, green, or reddish-brown. They love warm, dry conditions – basically, they think your grow room is paradise.
Red Spider Mites are actually the same species as two-spotted mites, just in their cold-weather phase. They turn red when temperatures drop, which is why outdoor growers often see them in fall.
The scary part? These tiny creatures can completely destroy a plant in just a few weeks if left unchecked. But don't worry – I'm going to show you how to stop them in their tracks using methods that won't harm your plants or the environment.
Early Warning Signs: What to Watch For
In my experience, the growers who successfully battle spider mites are the ones who catch them early. It's like spotting a small leak in your roof – fix it now, or deal with much bigger problems later.
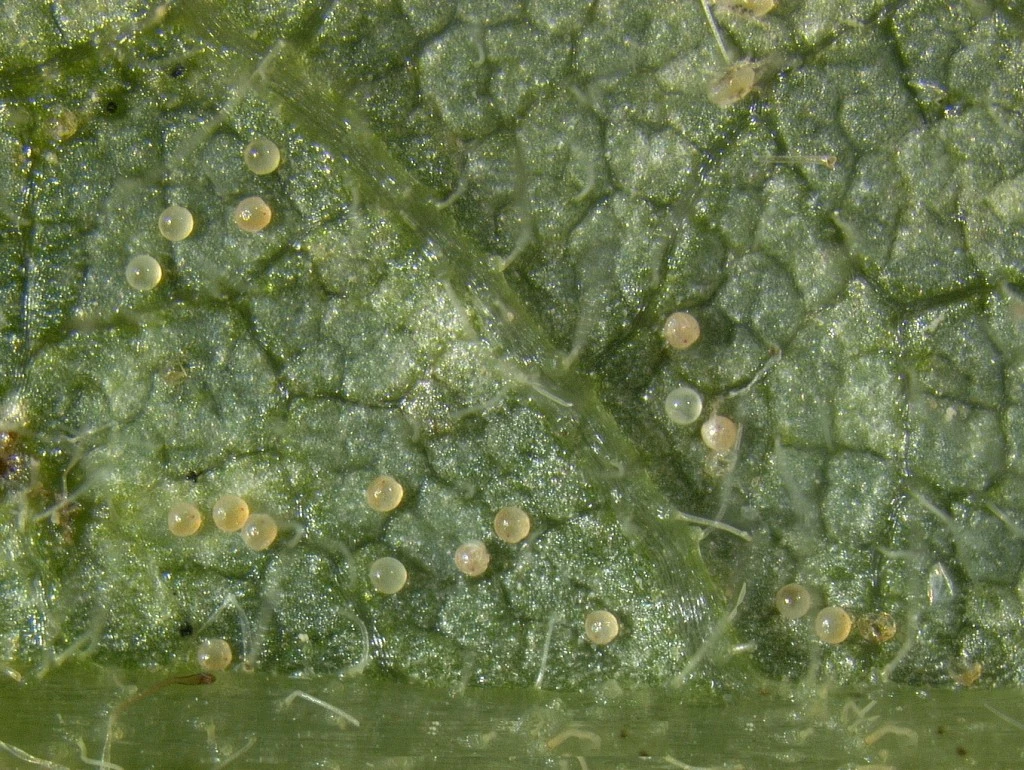
The First Clue: Stippling
The very first sign you'll notice is called stippling – tiny yellow or white spots on the upper surface of your leaves. At first glance, you might think it's nutrient burn or light stress. But here's the difference: stippling from spider mites appears as small, distinct dots rather than the broader yellowing you'd see from other issues.
The Web Evidence
Contrary to what many beginners think, you won't always see webs right away. Light infestations might not produce visible webbing at all. When you do start seeing webs, usually on the undersides of leaves or between leaves and stems, you're dealing with a more established colony.
The Leaf Damage Progression
As the infestation grows, those tiny yellow spots will multiply and eventually merge. The leaves will start looking bronzed or silvered, and you might notice them becoming dry and crispy. In severe cases, leaves will turn completely yellow and drop off.
The Movement Test
Here's a trick I learned from an old-timer grower: gently shake a suspected leaf over a white piece of paper. If you see tiny moving specks that look like pepper grains, you've got mites. This works because spider mites will drop off the leaf when disturbed.
Environmental Clues
Spider mites thrive in hot, dry conditions. If your grow room has been running warmer than usual (above 80°F) with low humidity (below 40%), you're creating prime real estate for these pests. Indoor growers often see infestations during winter when heating systems drop humidity levels.
For outdoor growers, pay extra attention during hot, dry spells. That beautiful sunny weather we love for our plants? Spider mites love it too.

Your Natural Action Plan: Organic Treatment Strategies
Alright, let's say you've confirmed you have spider mites. First, take a deep breath. I know it feels overwhelming, but I've seen countless growers successfully eliminate spider mites using natural methods. The key is acting quickly and consistently.
The Three-Pronged Natural Approach
1. Immediate Intervention
Your first move should be to isolate affected plants if possible. For indoor growers, this might mean moving plants to a separate room. Outdoor growers should focus on creating barriers to prevent spread to neighboring plants.
2. Environmental Modification
This is where the magic happens. Spider mites hate high humidity and moving air. If you can create conditions they despise, you're already winning the battle.
3. Organic Treatment Application
Natural treatments work best when applied consistently and in combination with environmental changes.
The Humidity Weapon
Here's something that might surprise you: raising humidity to 60-70% can literally stop spider mites in their tracks. They can't reproduce effectively in high humidity, and their eggs won't hatch properly.
For Indoor Growers:
- Use a humidifier in your grow space
- Place shallow water dishes around your plants
- Mist the air (not directly on plants during flower)
- Consider adding a wet towel system for emergency humidity boosts
For Outdoor Growers:
- Water the ground around your plants more frequently
- Use mulch to retain moisture
- Create windbreaks to reduce air circulation that dries out the area
- Consider shade cloth during the hottest part of the day
Natural Spray Solutions That Actually Work
I've tried dozens of natural remedies over the years, and here are the ones that consistently deliver results:
Neem Oil Solution
Mix 2 tablespoons of pure neem oil with 1 tablespoon of mild liquid soap (like castile soap) in a gallon of water. Spray thoroughly on all leaf surfaces, especially undersides, during cooler parts of the day. Neem oil disrupts the mites' hormone systems and makes it hard for them to reproduce.
Rosemary Oil Spray
This one's a game-changer that many growers don't know about. Mix 1 tablespoon of rosemary essential oil with 1 tablespoon of liquid soap in a gallon of water. Spider mites absolutely hate the smell, and it's completely safe for your plants.
Garlic and Pepper Spray
Blend 3 cloves of garlic with 2 hot peppers in 2 cups of water. Strain and add to a gallon of water with a tablespoon of soap. This creates a hostile environment that mites want to avoid.
Diatomaceous Earth (DE)
Food-grade DE can be dusted on leaves and soil. It's like microscopic glass to soft-bodied insects but completely harmless to humans and pets. Apply during dry conditions for maximum effectiveness.
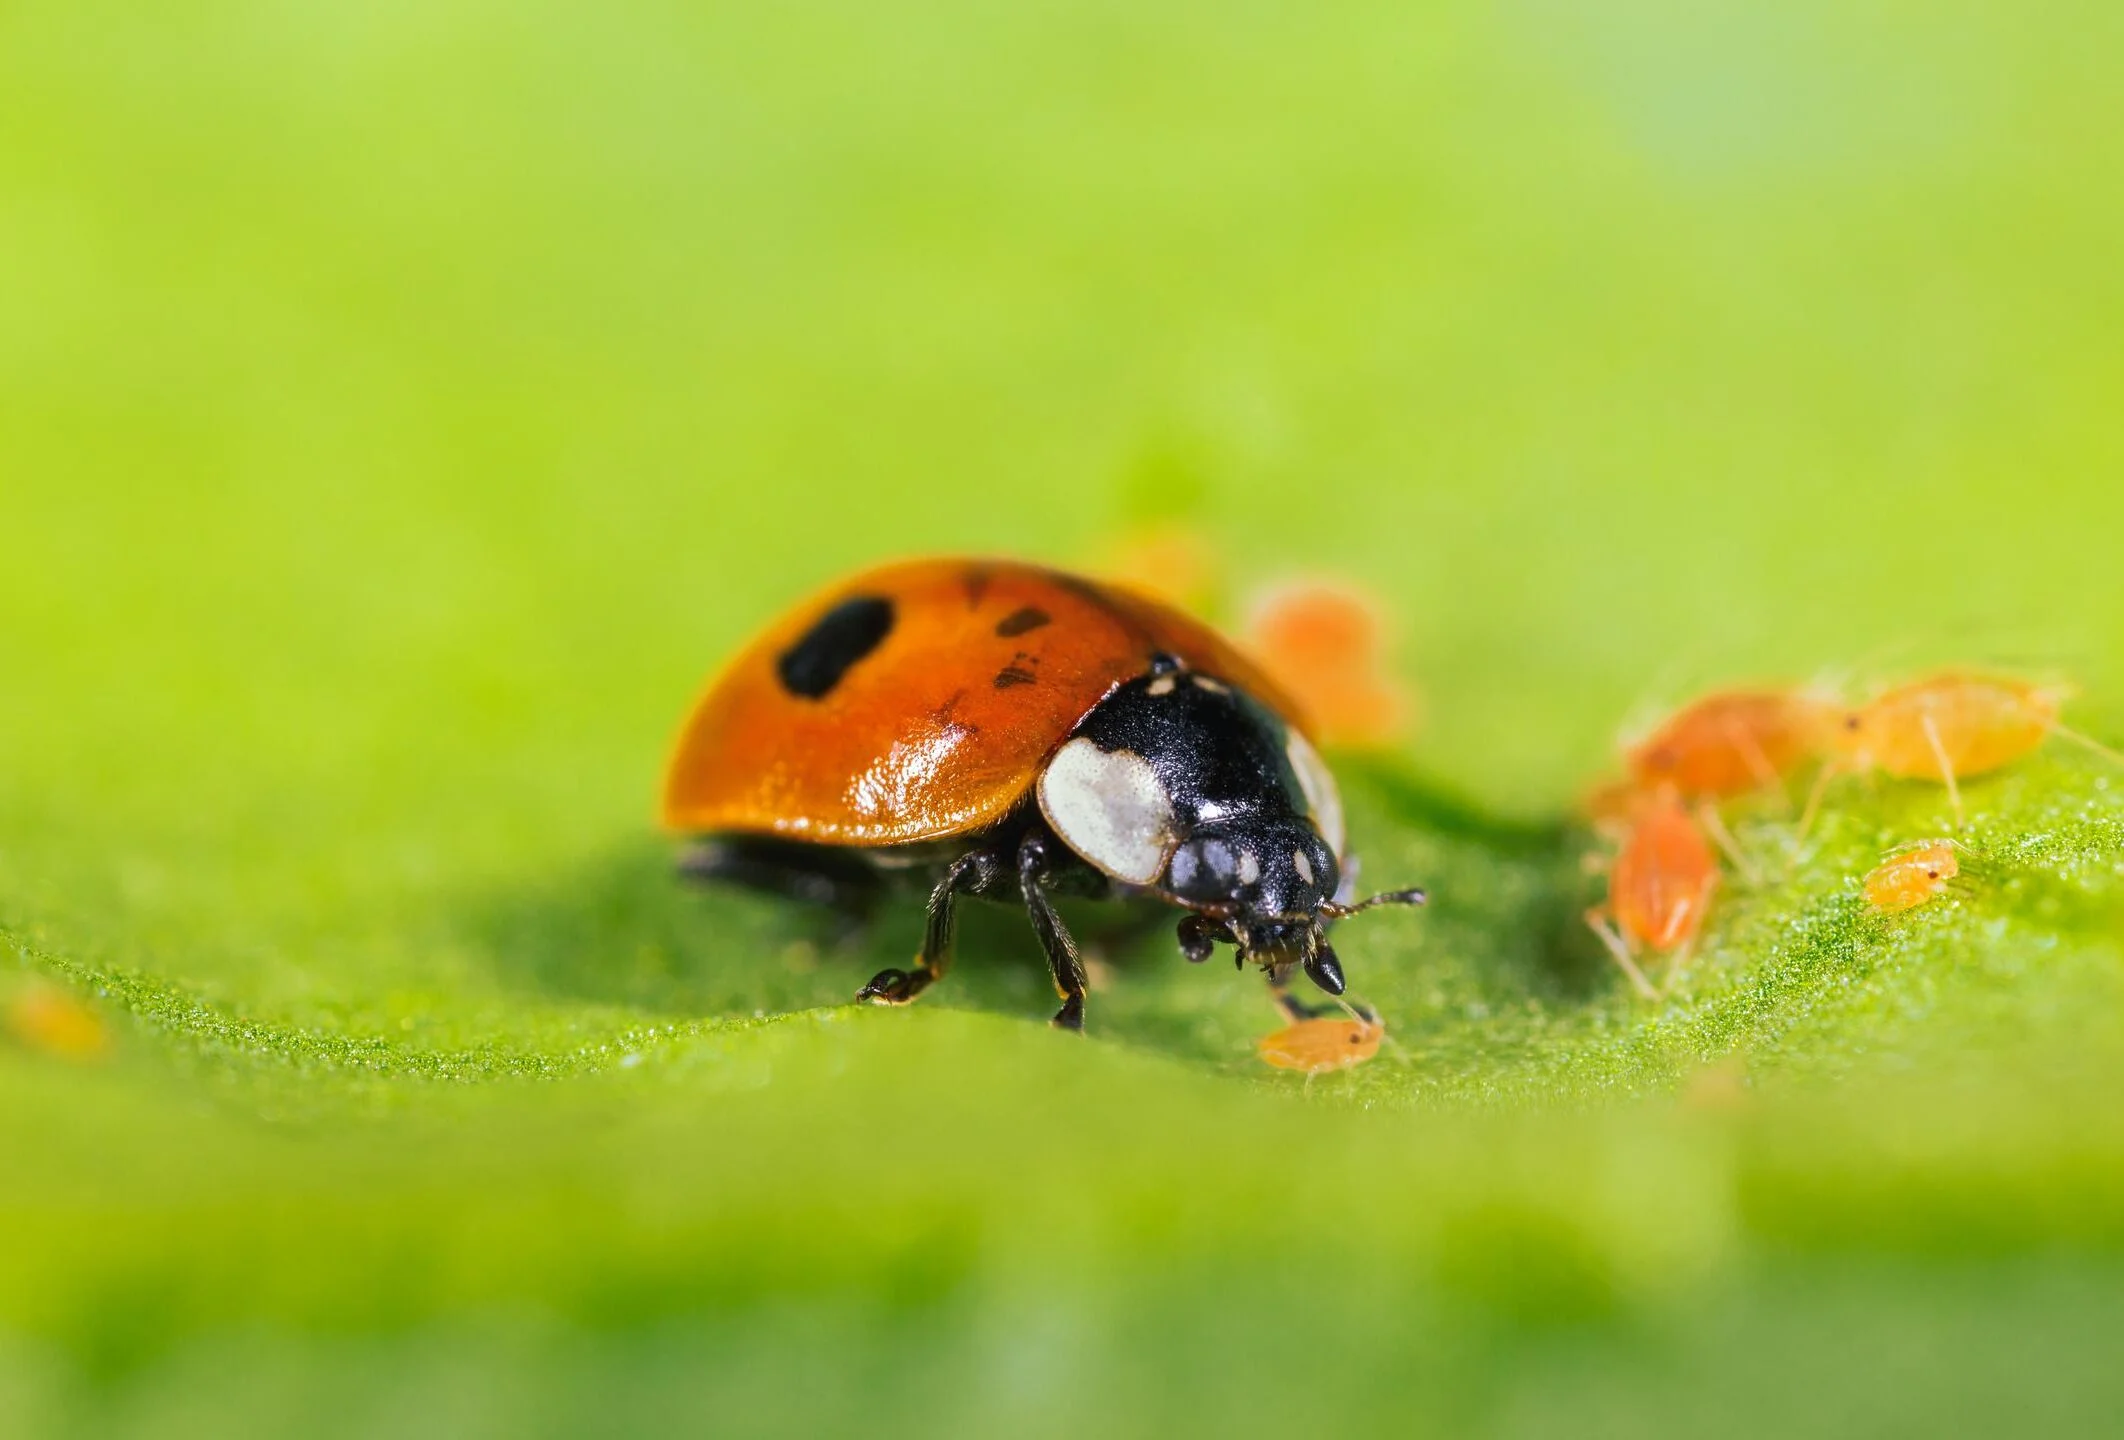
The Power of Beneficial Insects
Nature has already created the perfect spider mite predators. Introducing beneficial insects is like hiring a specialized security team for your plants.
Ladybugs
These aren't just pretty garden decorations – they're voracious mite eaters. A single ladybug can consume up to 5,000 aphids and mites in its lifetime. Release them in the evening when they're less likely to fly away.
Predatory Mites
Yes, you're fighting mites with mites! Predatory mites like Phytoseiulus persimilis are spider mite specialists. They don't harm plants but will hunt down pest mites relentlessly.
Lacewings
These delicate-looking insects are actually fierce predators. Their larvae are particularly effective against spider mites and other soft-bodied pests.
Application Schedule for Success
Consistency is absolutely crucial. Here's the schedule I recommend:
Week 1: Daily Treatment
- Morning: Check humidity levels and adjust
- Evening: Apply chosen spray treatment
- Night: Release any beneficial insects
Week 2: Every Other Day
- Continue spray treatments but reduce frequency
- Monitor for improvement
- Maintain high humidity
Week 3: Maintenance Mode
- Spray 2-3 times per week
- Focus on prevention strategies
- Celebrate your success!
Prevention is Your Best Friend: Creating a Mite-Hostile Environment
Let me share something I learned the hard way: preventing spider mites is infinitely easier than treating them. After dealing with several infestations in my early growing days, I completely changed my approach to focus on prevention. I haven't had a serious spider mite problem since.
The Environmental Control Strategy
Humidity Management
Keep your humidity between 50-60% during vegetative growth and 40-50% during flowering. This range supports healthy plant growth while making conditions less favorable for mites.
Air Circulation
Spider mites hate moving air. Install oscillating fans to create gentle air movement throughout your grow space. For outdoor growers, avoid completely sheltered areas where air becomes stagnant.
Temperature Control
Keep temperatures below 80°F when possible. Spider mites reproduce much faster in hot conditions, so temperature control is crucial for prevention.
The Companion Planting Approach
Aromatic Herbs
Plant basil, mint, rosemary, and oregano around your cannabis plants. These herbs naturally repel spider mites and other pests while adding beneficial diversity to your garden.
Trap Crops
Some growers use beans or tomatoes as "trap crops" – plants that attract spider mites away from cannabis. While controversial, this can be effective in larger outdoor grows.
Ground Cover
Living mulch like clover can help maintain soil moisture and create habitat for beneficial insects that prey on spider mites.
Regular Inspection Routine
The Weekly Walk-Through
Every week, spend 10-15 minutes carefully examining your plants. Look for:
- Changes in leaf color or texture
- Tiny spots on leaf surfaces
- Any webbing between leaves
- Signs of stressed plants
The Monthly Deep Check
Once a month, use a magnifying glass to examine the undersides of leaves more closely. This catches problems before they become visible to the naked eye.
Documentation
Keep a simple log of your inspections. Note environmental conditions, any changes in plant health, and treatments applied. This helps you identify patterns and improve your prevention strategies.

Common Mistakes That Make Things Worse
Let me save you from the mistakes I've made and seen countless other growers make. Sometimes, our best intentions actually make spider mite problems worse.
The Over-Watering Trap
When growers see stressed plants, their first instinct is often to water more. But spider mites love the humid conditions that over-watering creates at the soil level, combined with the stressed plant environment. Focus on foliar humidity, not soil moisture.
The Chemical Escalation
I've seen growers panic and reach for harsh chemicals, thinking they need something stronger. But spider mites develop resistance quickly, and chemicals can harm beneficial insects that would naturally help control the problem.
The Isolation Mistake
While isolating severely affected plants makes sense, don't isolate your treatment approach. Spider mites can travel between plants, so treat your entire grow space as one ecosystem.
The Timing Errors
Wrong Time of Day
Never spray oil-based treatments during the heat of the day. This can burn your plants and make treatments less effective. Early morning or evening applications work best.
Inconsistent Treatment
Starting strong and then tapering off too quickly allows surviving mites to rebuild their population. Stick to your treatment schedule even when things look better.
The Environmental Neglect
Focusing only on spray treatments while ignoring environmental factors is like trying to empty a bathtub with the faucet still running. You need to address the root conditions that allowed mites to thrive.
When to Call in the Big Guns: Dealing with Severe Infestations
Sometimes, despite our best efforts, spider mites get the upper hand. Don't feel defeated – even experienced growers face severe infestations occasionally. The key is knowing when to escalate your response.
Signs You Need Emergency Intervention
Widespread Webbing
If you see extensive webbing covering multiple leaves and branches, you're dealing with a well-established colony that needs aggressive treatment.
Rapid Leaf Drop
When plants start losing leaves quickly, the mites are winning. This signals that you need to step up your treatment intensity.
Multiple Plant Involvement
If mites have spread to multiple plants, you're looking at a systemic problem that requires comprehensive action.
The Emergency Response Protocol
Immediate Isolation
If possible, move the most affected plants away from healthy ones. For outdoor growers, consider protective barriers or even removing severely affected plants to save the rest.
Intensive Treatment Schedule
Switch to daily treatments for the first week, then gradually reduce frequency as you gain control.
Environmental Shock
Temporarily increase humidity to 70-80% if your plants can handle it. This can stop mite reproduction completely.
Beneficial Insect Reinforcement
Release larger quantities of predatory insects. In emergency situations, don't hold back on beneficial insect releases.
The Nuclear Option: Plant Removal
Sometimes, the kindest thing you can do is remove severely affected plants to save the rest of your garden. This is a hard decision, but it's sometimes necessary to prevent total crop loss.
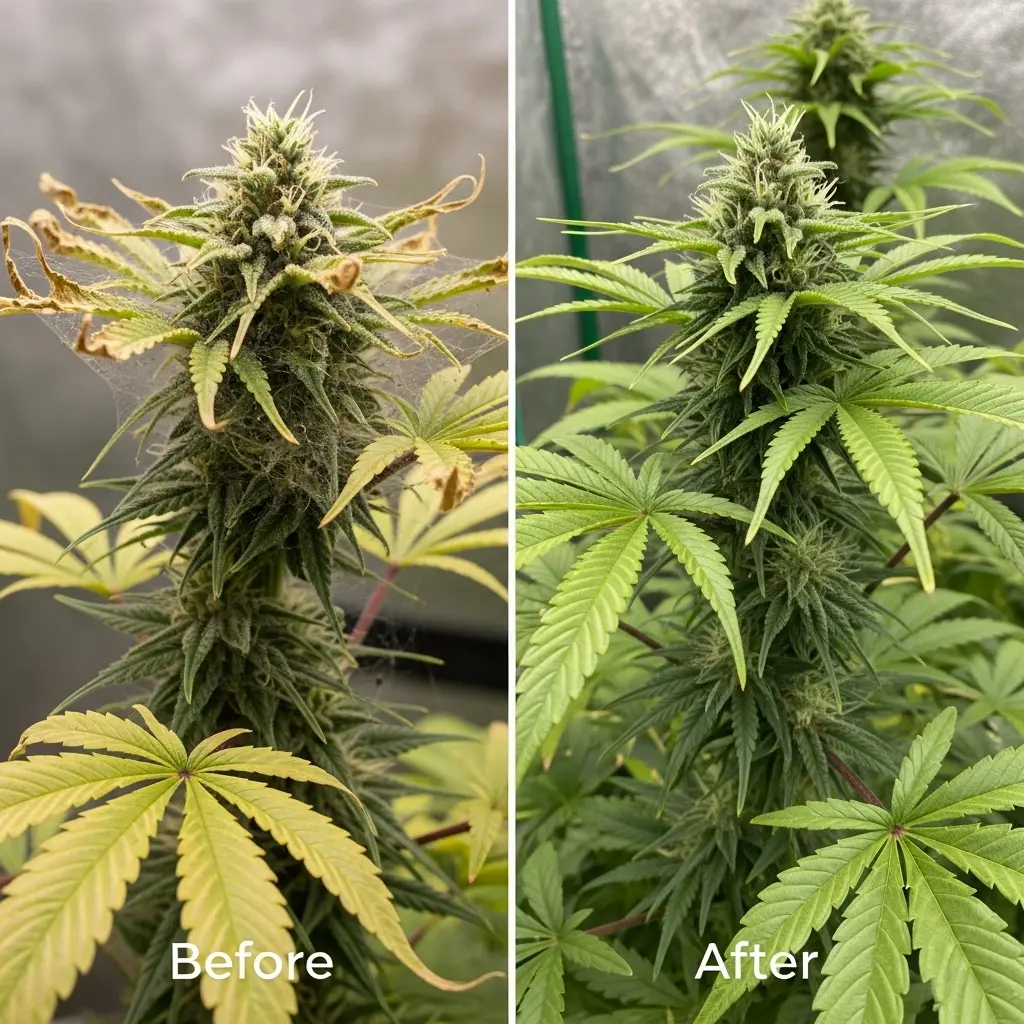
Recovery and Long-Term Success
Once you've gained control over your spider mite problem, the focus shifts to recovery and preventing future issues. This is where many growers make the mistake of relaxing too soon.
Supporting Plant Recovery
Gentle Nutrition
Stressed plants need gentle care. Reduce nutrient strength by about 25% and focus on organic supplements that support plant immune systems.
Pruning Damaged Growth
Remove heavily damaged leaves and branches. This helps plants focus energy on healthy growth and removes potential hiding spots for any surviving mites.
Patience with New Growth
New growth will be your indicator of success. Healthy, vibrant new leaves without stippling mean you're winning the battle.
Building Long-Term Immunity
Soil Health
Healthy soil creates healthy plants that are naturally more resistant to pests. Add compost, beneficial bacteria, and mycorrhizal fungi to build soil ecosystem strength.
Plant Diversity
In outdoor grows, increasing plant diversity creates a more balanced ecosystem that naturally controls pest populations.
Seasonal Awareness
Learn the seasonal patterns in your area. Spider mites often peak during hot, dry periods, so prepare your defenses accordingly.
Your Success Story Starts Now
Here's what I want you to remember: spider mites are challenging, but they're not invincible. Every successful grower has faced them at some point, and the experience, while frustrating, makes you a better cultivator.
The natural methods I've shared aren't just environmentally friendly – they're often more effective than chemical treatments because they work with natural systems rather than against them. You're not just killing pests; you're creating an environment where your plants can thrive and defend themselves.
Your Action Steps:
- Implement the prevention strategies immediately, even if you don't have mites yet
- Set up your regular inspection routine
- Gather your natural treatment supplies so you're ready if needed
- Focus on environmental control as your primary defense
- Remember that consistency beats intensity every time
What's Next?
Start with the prevention strategies in this guide. Create that hostile environment for spider mites through humidity control, air circulation, and companion planting. Your future self will thank you for the effort you put in now.
Spider mites taught me that growing cannabis isn't just about nutrients and lights – it's about creating a complete ecosystem. Once you master this approach, you'll not only defeat spider mites but become a more skilled and confident grower overall.
The most rewarding part? When you successfully prevent or overcome a spider mite challenge using natural methods, you know you've created something sustainable and healthy. Your plants will be stronger, your growing skills will be sharper, and your confidence will be unshakeable.

Remember, every expert was once a beginner who refused to give up. Your spider mite challenge is just another step in your journey to becoming a master grower. You've got this!